Showing posts with label portrait. Show all posts

Saturday, 10 December 2011

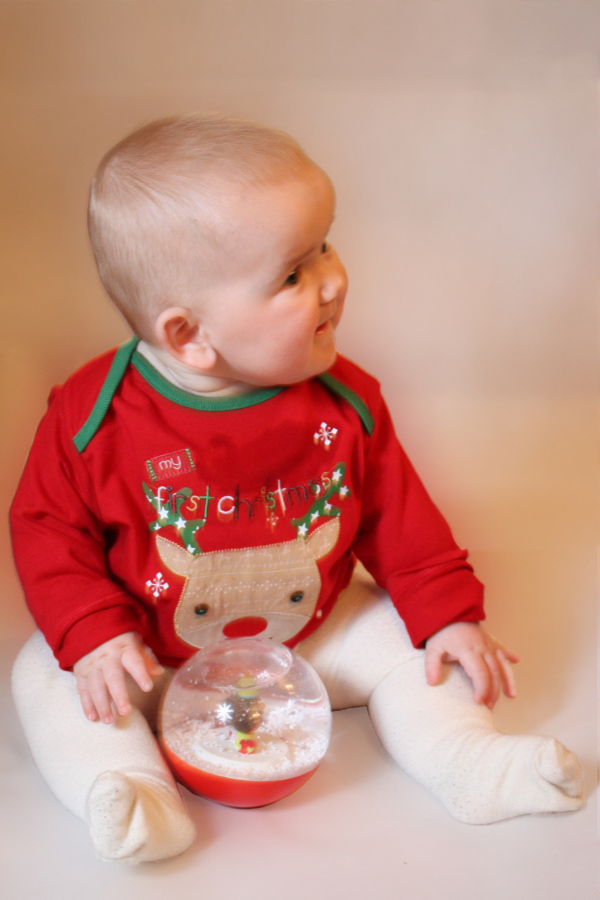
Baby's First Christmas

My good friend's baby will be having their first Christmas this year and the grandparents requested a picture of her in festive attire so they could send out some personalised Xmas cards to friends and family.

I volunteered my services and we had some fun last Sunday afternoon rearranging their lounge and setting up some shots then trying to keep the baby amused and looking in (roughly) the right direction!

Here are a few of favourites from the day.


As usual, click on the images to enlarge.

Sunday, 6 November 2011

Two Faced

Inspired by Venezuelan artist Jesús González Rodríguez and his project called 1/2 I thought I would have a go and combining a face on portrait with a side profile.

I just took 2 quick snaps, edited them together using Photoshop then added a texture. The whole process took less than 15 minutes.

Thursday, 10 March 2011

Mirror Me

Been taking a few more black and white photographs recently as I really like the strong contrast between highlights and shadows.

Have been thinking of some subjects for this monochrome photography but in the meantime, here is a self portrait of me taken in a mirror.


As usual, click on the image to enlarge.

Tuesday, 14 December 2010

Random Self Portrait

Haven't used my camera much recently so took it along on a trip to see some family at the weekend.

Took this random self portrait in the wing mirror on the way!

Sunday, 17 October 2010

Wedding Day

Back in August I did another wedding shoot for a friend. This time I got paid which was nice and gave me a bit more spending money when I went on holiday recently :)

After the wedding I did earlier in the year I found this one a lot easier and knowing less people I felt that I could be a lot more assertive in telling people what to do, where to stand etc!

I also did the pre wedding shots for the bride to be which I enjoyed as I could be a bit more creative (see the first picture below).

I managed to save a lot of time post wedding with the processing of the photos as I had learnt from previous mistakes!

Anyway, here are a few shots from the day...


As usual, click the images to enlarge.

Thursday, 16 September 2010

Makeup - A Girls 2nd Best Friend!

Had a really hectic month or so hence the severe lack of posts.

Attended 4 weddings in the past 6 weeks and was the official photographer at one for some friends (photos to follow on a later post) so been busy busy with all that and life in general.

Anyway, I have also recently helped out a friend of a friend with a few pictures as she is starting up as a beauty therapist and wedding makeup artist and needed a few shots for her website and advertising.

Here a a few shots from the day...


As usual, click the images to enlarge.

Monday, 28 June 2010

Wedding Shoot Tips

As promised in my Wedding Shoot post, here is a follow up.

This might be useful to you if you are thinking of doing your first wedding shoot.

Venue - I found that it was well worth visiting the venue before the wedding day to take some sample shots (of the bride and groom if possible). This will give you some idea of the space available and the different backgrounds that can be utilised. It will also give the prospective bride and groom a chance to see how the scene looks in pictures and make choices on where they would like the photos taken. Also, think about where the photographs will be taken if the weather is bad on the wedding day as it was on the wedding shoot that I did (it rained for most of the day)!

Tripod - If you have one then it's worth using. I had to do most of the formal shots indoors. Also a quick tip - make sure you set it up and it's level before you start taking the shots. Mine was slightly off level and although it's easy enough to straighten up the pictures whilst processing it will save you a job if it's right at the time!

Lenses - You're more than likely not going to have time to change lenses, especially during the formal shoot so go with a good all rounder.

Cropping - If you're like me and most of your photographs are used online then you'd probably be more used to cropping to common screen resolution sizes rather than print sizes. I spent a lot of time re-converting my original RAW images and re-cropping photos after making this error initially! Photos that are likely to be printed need to be cropped to a print size ratio (such as 7x5"). If you just hand a printer a copy of all your shots straight from the camera then they will be cropped during the printing process and you may end up with important bits missing!

File Format - If you have a camera which will shoot in RAW format then that's the way to go. The photographs will take up more space on your memory cards and will take longer to process after the day but you will be able to make many more adjustments after the event which is great as you probably will not have time to review each shot in great detail in real time.

I hope that this post has been of use to any prospective amateur wedding photographers. I've got another wedding to shoot later in the year so I will be putting these things in to practice then.

Here are a few photos from my first wedding shoot...


Tuesday, 25 May 2010

Wedding Shoot

So, it's has been a while since I posted. It's actually been over a month so I've really been slipping this time....sorry folks. I aim to start posting a bit more regularly again (time permitting!).

Anyway, along with work and the other things that keep most of us busy, I have recently done my first wedding shoot! It was for some good friends and although somewhat stressful at times during the day and a lot of work on the computer after the event I have learnt a lot and hopefully ended up with a good album of pictures that they will like.

I'm not going to post any pictures of the actual wedding here until the happy couple have seen them (they are still off enjoying their honeymoon) but I did take the shot below of the invitation to use as a Wedding photo DVD cover so will share that one.


For any of you who are thinking (or have been asked) to do your first wedding shoot I will follow this post up in the next week or so with some of the problems I had, mistakes I made and tips that may be useful so watch this space.

Thursday, 11 February 2010

Ladies in Red

I am back from an excellent skiing trip, fully refreshed and raring to go! Unfortunately, I didn't take many pictures at all this year as I spent all my time out on the piste! (read that whichever way you like!!)

However, seeing as it is Valentines day on Sunday I thought I'd post my latest installment of the girls from Beautiful You.

Here is their Valentines inspired shot.

Thursday, 3 December 2009

Beautiful You

I mentioned in this post a while back that I was doing some photography for some friends that were starting up a website.

Well, Stace & Mags now have the site up and running. Please support them by going to www.beautyu.co.uk and taking a look.

Tuesday, 1 December 2009

Airbrushing - Because You're Worth It!

I have been doing a few projects recently that have involved some requested photo retouching / airbrushing. I use both Photoshop and Paintshop Pro so experimented with different techniques in each until I came up with something that I was fairly happy with.

This process does differ depending on the photo but I now use a general routine for the smoothing out of skin without making the subject look fake and also trying to keep the important details.

I was looking for a model but as no one was available I had to take a quick snapshot of myself to work on. After a long weekend and lots of late nights, a retouch was just what I needed!!!

Here is the before shot, straight out of the camera.


Here is the same shot again after some retouching.


Click on the images to enlarge as the differences are more noticeable.

================================================

Here are the steps that I look to achieve this.

  • Opened the original image in Photoshop and removed any blemishes with the spot healing tool

  • Duplicated the background layer and applied the dust and scratches filter with a radius of about 3 pixels and a threshold of 0

  • Applied a gaussian blur with a radius of about 1.4 pixels

  • Applied some texture to the image by using the add noise filter (1%)

  • Added a layer mask revealing all and filled the mask with black

  • Set the colour to white and used a paintbrush to brush in the new smooth skin

  • Lightened up the areas around the eyes and brightened up the eyes themselves

  • Applied some adjustment layers (curves and colour balance)


  • This technique does seem to work better on photos of women but then we are used to them having much smoother skin than us guys anyway :)

    Thursday, 15 October 2009

    Website Photoshoot

    Some friends of mine are starting up a website and asked if I could take a few pictures for the site so I spent an enjoyable evening on Monday taking a variety of shots for them.

    As you'll notice from my blog, I don't take a great amount of people shots so it was really good practice for me, especially with a wedding shoot coming up next year. There were a fair few shots that went straight to the recycle bin (the beauty of digital!) but we did end up with some good results and they were both pleased so all is good.

    Here is one of the shots taken during the evening. I will post more after their site goes live.

    Monday, 24 November 2008

    Photoshoot With A Friend

    Last Saturday I did a photo shoot at home with a good friend Stace who I coaxed (actually she was really up for doing it) in to being my model for the afternoon. We had a great time and it allowed me to try out various different styles of photography (portrait, action etc).

    During the afternoon I took around 400 photos and have only had the chance so far to do a first pass and deleted around half which were unusable due to bad focus, blinking, bad lighting and ones which I knew she would blatantly not like!

    Here are just a few of the ones that I have liked so far with more to follow once I've had a chance to sort through them.


    Friday, 14 November 2008

    Flag Waving

    A little bit of flag waving to follow on from the Remembrance Day post.


    Friday, 7 November 2008

    Jumping to Conclusions

    Finally got around to posting my first picture taken with the Canon RC-1 remote. Thought I'd try a jump / levitation type shot and quite like the result. Who said White Men Can't Jump!!

    Oops, you can still actually see the remote in my right hand!! :)

    Jumping to Conclusions

    Wednesday, 5 November 2008

    Wetsuit Required

    One of the first portrait shots taken with the Nifty Fifty. This is also another example of using textures on my photographs.

    Wetsuit Required

    Tuesday, 4 November 2008

    Dark Portrait

    Experimentation with portrait taken with ambient light.